 Virtual Colossus
What is Paper Lorenz?
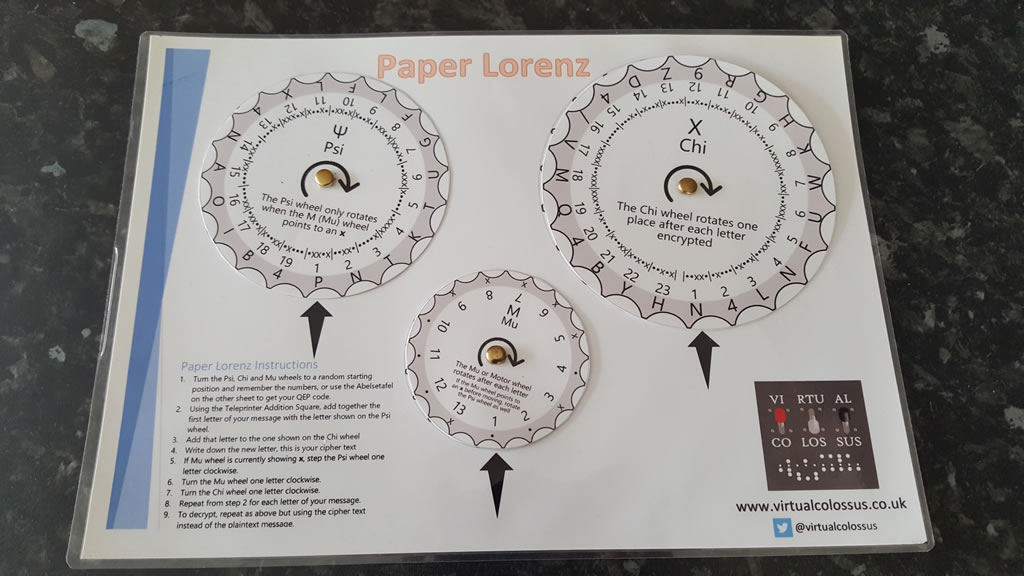
Paper Lorenz is a simplified paper version of the Lorenz SZ40/42 cipher attachment used during World War II. It helps you understand how the Lorenz SZ40 generated its cipher.
The Lorenz SZ40 was used to send top-secret messages between the German High Command and the generals at the front. It had twelve cipher wheels, which generated two separate key letters. These two letters were added (using modulo-2, or XOR) to each letter of the plain text to make the cipher message.
With Paper Lorenz you can encipher and decipher short messages just like the real machine. The Psi and Chi wheels each stand for five of the real Lorenz cipher wheels, while the Mu wheel stands for the other two.
Download
Download the PDF. You will need to print at least the first two pages to make Paper Lorenz.
Making it
You will need:
- the PDF pages above, printed out
- scissors
- 3 round-head paper fasteners
- optionally, if you have a laminator, laminate pages 1 and 2 before you start, to make them last longer
To make it:
- Cut out each of the three wheels on the second page. (It’s fine to just cut round the outer circle.)
- Line up each wheel with its marked space on the backing page.
- Carefully push a paper fastener through the cross at the centre of each wheel, and bend the metal legs apart to hold it in place.
- Check you can turn each of the three wheels.
Using Paper Lorenz
- Turn the Psi, Chi and Mu wheels to a random starting position, or use the Ablesetafel on the other sheet to get your QEP code.
- Using the teleprinter addition square, add the first letter of your message to the letter shown on the Psi wheel.
- Add that letter to the one shown on the Chi wheel.
- Write down the new letter: this is your cipher text.
- If the Mu wheel is showing x, turn the Psi wheel one letter clockwise; otherwise carry on.
- Turn the Mu wheel one letter clockwise.
- Turn the Chi wheel one letter clockwise.
- Repeat from step 2 for each letter of your message.
- To decrypt, do the same, but using the cipher text instead of the plain text message.
Example: encrypting a message
In this example we will encrypt the message SECRET, using the start positions Psi 1, Mu 1, Chi 1.
Turn all three wheels so the black arrows point to number 1 (as in the picture above).
This is the starting position for this message; a different starting position gives a different result.
The first letter of the message is S, and we are going to “add” it to the two key letters generated by the Lorenz (the Psi and Chi). Adding letters really means converting them to their 5-bit ITA2 codes and adding those using modulo-2 (or XOR) to give another letter. For more detail on how this was done for real, see the Lorenz machine.
Look at the Psi wheel: the letter it is currently on is P.
Find the sheet with the teleprinter addition square: a table that gives the result of adding any two letters.
To add S + P, find S on one side of the square and P on the other, and see which letter is where the two meet.
Hint: use a ruler or the straight edge of a piece of paper to line up row S first, then read down from P. It doesn’t matter which way round you do it: S + P is the same as P + S.
The answer should be W.
Using the same method, add the W you just got to the Chi wheel’s key letter, N.
The final answer, and our first cipher letter, should be the character 8. Write it down.
After enciphering each letter, the real Lorenz moved its wheels in a set pattern, so the second letter is enciphered with two different key letters. This means that even if the second letter of the message were the same as the first, the cipher letters would be different. Follow these rules to move the three wheels:
- Look at the current value of the Mu (motor) wheel: it will be either a cross or a dot. If it is a cross, turn the Psi wheel one position clockwise. If it is a dot, go on to the next step without moving the Psi wheel. In our example, Mu is in position 1, showing a dot, so don’t change anything; just go to step 2.
- Always move the Mu wheel one position clockwise. It should now be at position 2, another dot.
- Always move the Chi wheel one position clockwise. It should now be at position 2, character 4.
Now repeat the steps for the next plain text letter, E. We want to add E + P + 4, which should give Y. Notice that the Chi key letter has changed for the second letter, while the Psi wheel is still on the same one.
Move the wheels on as before: Mu is a dot, so no change to Psi; move Mu and Chi one position clockwise.
The third letter of the message is C, so the next sum is C + P + L, which equals R.
Move the wheels again. This time Mu is a cross, so move the Psi wheel on one position, to number 2, character N, and move the Mu and Chi wheels too.
The fourth letter is R, and this time both the Psi and Chi key letters are different: R + N + N = R.
Fifth letter: E + N + F = /. Sixth letter: T + T + U = U.
So the final cipher text is 8YRR/U.
| Plain | S | E | C | R | E | T |
|---|---|---|---|---|---|---|
| ψ Psi | P | P | P | N | N | T |
| χ Chi | N | 4 | L | N | F | U |
| Cipher | 8 | Y | R | R | / | U |
Notice in the table that the Chi letter changes for every letter of the message, while the Psi letter often stays the same. This “stagger” was meant to create a longer key that would rarely repeat, but it was actually one of the main flaws that let the codebreakers at Bletchley Park break the cipher. See breaking by statistics on Virtual Colossus for how this was done, and how the world’s first electronic computer came to be built.
Deciphering a message works exactly the same way: set all three wheels to the same start positions used to encipher it, then add the first letter of the cipher text, rather than the plain text, to the Psi and Chi: 8 + P + N = S. Repeat the steps above to get your message back.
Paper Lorenz and Virtual Lorenz
The three wheels of Paper Lorenz are simplified versions of the twelve real Lorenz wheels, but the letters they generate are the same as a Lorenz SZ40 using the Bream pin settings available in Virtual Lorenz. This means you can use Virtual Lorenz to check a message enciphered with Paper Lorenz (up to about 23 characters, assuming you start at Chi setting 1, after which it no longer matches).
The Chi wheel on Paper Lorenz stands for all five wheels on the right-hand side of Virtual Lorenz. Against each position on the Paper Lorenz Chi wheel is its 5-bit ITA2 code: a series of dots and crosses (offs and ons) that together represent a character. The table below gives the ITA2 code for each character, shown as holes punched in paper tape. A cross is a hole in the tape, and a dot is solid tape with no hole.
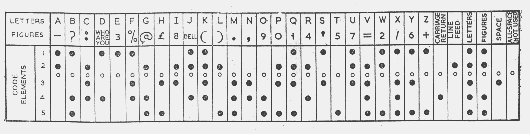
Adding two letters means taking each of the 5 impulses of both characters in turn and using these rules: if the symbols are the same, the result is a dot; if they are different, the result is a cross.
| Letter | Impulses | ||||
|---|---|---|---|---|---|
| A | x | x | • | • | • |
| S | x | • | x | • | • |
| Result (I) | • | x | x | • | • |
Checking your message on Virtual Lorenz
To encipher SECRET on the original Virtual Lorenz and see if you get the same result, first set Virtual Lorenz to the basic SZ40 model and set the pins to the Bream message settings.
- Open the Prefs menu, then choose Settings.
- Make sure the Lorenz Model switch at the top is set to SZ40.
- Check that the KT-Schalter (plain text switch) is set to Aus (off).
- Press the BREAM pattern button to set the pins on the wheels.
- Click Close, at the bottom of the settings menu.
- Our starting position has every wheel at 01. If you have moved any wheels, turn them all back to 01.
- Make sure the Lorenz is switched on: the red switch at the bottom centre of the machine should be at Ein.
- To encipher the message, use the on-screen keyboard or just type SECRET.
If everything is set correctly, the lower Send/Recv tape should show 8YRR/U, exactly what we got with Paper Lorenz.
Note: the Lorenz wheels actually turn backwards relative to the numbers on them. The last Chi wheel (12) goes from position 1 to 23, 22, 21 and so on, rather than counting up, so the letters on Paper Lorenz don’t match the positions on the real wheels, but they do run in the same order.
For example, to start Paper Lorenz at Psi 1, Mu 2, Chi 3, and set Virtual Lorenz to the same starting position:
- The Psi wheels are already at position 1, so leave the first five wheels at 01.
- Both Mu wheels need to move on one position. These are wheels 6 and 7 on the Lorenz. Turn each of them down one position (6 should show 37, 7 should show 61).
- All the Chi wheels need to move on two positions. Press the down arrow twice on each of the last five wheels (8–12), giving 40, 30, 28, 25, 22.
Virtual Lorenz should now be at the same settings as Paper Lorenz.
Important: once any of the Paper Lorenz wheels goes past its highest setting (23 for Chi, 13 for Mu or 19 for Psi), our limited paper wheels no longer match the real Lorenz. So if you’re brave enough to try more than a few characters and want them deciphered on Virtual Lorenz, start with low starting positions on the wheels.
The answers
If you’re really stuck, download the answers to the challenge page.
Paper Lorenz challenge answers (PDF)
Paper Enigma
If you’ve enjoyed making Paper Lorenz, how about making a Paper Enigma too? Paper Enigma is a fantastic idea from Franklin Heath Ltd that lets you make a working Enigma cipher machine in 3D from a few print-outs and a crisp tube.
Licence
Please feel free to use Paper Lorenz to learn about the Lorenz SZ40/42 machine and how it enciphered messages. Do let me know if you find it useful, or if you have any feedback or ideas for making it easier to use or understand.